In this article, we’ll delve into the art of setting a timer on the Instagram camera.
Instagram, the popular social media platform, offers its users a unique feature for sharing ephemeral moments: pictures and videos that fade away after a mere 24 hours.
These ephemeral stories, aptly named “Instagram Stories,” come packed with a multitude of impressive features, and among them shines the Countdown Sticker.
The Countdown Sticker is a versatile tool that allows you to initiate a countdown for virtually any special occasion, whether it’s a holiday extravaganza, a birthday bash, or any other significant life event you hold dear.
This dynamic sticker seamlessly integrates into any post, granting users the ability to meticulously monitor their journey toward the impending milestone, while simultaneously sparking enthusiasm among their circle of friends and family.
With the Countdown Sticker at your disposal, Instagram unfolds as a vibrant playground, empowering individuals to embark on an exhilarating, creative journey as they eagerly await their cherished milestones.
Unlocking the Magic of Instagram’s Countdown Sticker
Have you ever wanted to keep your Instagram followers eagerly anticipating an upcoming event, be it a birthday bash, a product launch, or that long-awaited vacation? Look no further than Instagram’s “Countdown” sticker. This nifty tool adds a dynamic timer to your Instagram Stories, giving your audience a visual reminder of the big day. Let’s delve deeper into this engaging feature.
Countdown Sticker Unveiled: What It Is and Isn’t
- Dynamic Timing: Instagram Stories boast an exclusive gem known as the “Countdown” sticker. This nifty feature serves as a visual timer, enabling you to configure it for any impending, momentous occasion in your life;
- Inclusive Occasions: Birthdays, product launches, dreamy vacations, and any other memorable event you can conjure are all fair game. Harness this sticker’s power to not only keep yourself well-informed but also to ignite excitement among your cherished followers;
- Instagram’s Unique Offering: It’s crucial to emphasize that this timer sticker is reserved exclusively for Instagram Stories. It finds no place in regular Instagram posts, carving out its niche within Stories alone;
- Distinct from the Rest: The “Countdown” sticker is unequivocally distinct from other countdown tools, making it a user-friendly means to ensure you never let an important moment slip through the cracks.
Making the Most of the Countdown Sticker
Here are some useful tips and insights on using the “Countdown” sticker effectively:
- Stay Organized: Use it to keep track of personal milestones, friends’ birthdays, or even industry events and holidays relevant to your business;
- Captivate Your Audience: Involve your followers by sharing the countdown, cultivating excitement and interaction. Feel free to infuse your countdown announcement with creative flair!;
- Customize with Colors: Make your countdown stand out by personalizing its color scheme to match your brand or personal style;
- Edit with Ease: The sticker is highly customizable; you can resize and reposition it with two fingers to fit your Story’s aesthetics.
Setting Up Your Instagram Countdown Timer
Now, let’s walk through the steps to set up this captivating Instagram countdown timer:
- Launch Instagram: Begin by opening the Instagram app on your smartphone;
- Log In: If you’re not already logged in, enter your credentials and access your account;
- Access Stories: Swipe right to access the Stories camera;
- Choose Content: Capture a photo or video or upload an existing one as your background;
- Add Sticker: At the top of the screen, tap the square smiley face icon;
- Select “Countdown”: Scroll through the available options and choose “Countdown.”;
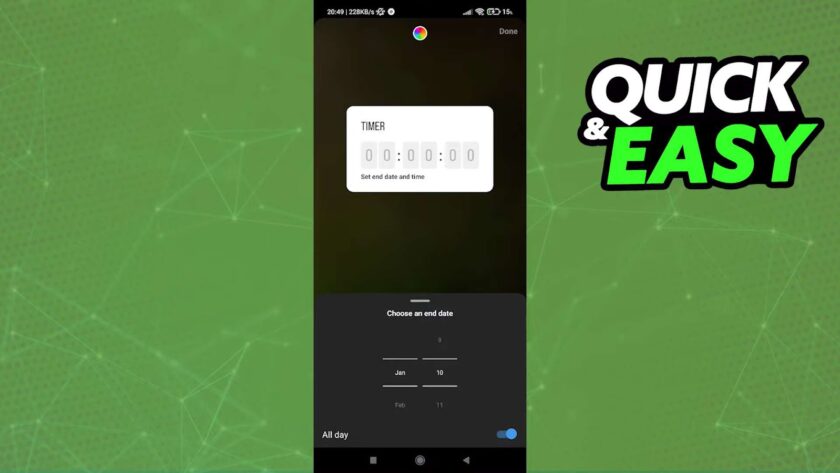
- Set Title: Tap “Countdown name” and give your countdown a title;
- Set Date and Time: Adjust the date and time for your countdown by tapping on the time section. If it’s an all-day event, leave “All day” on;
- Color Customization: To personalize the countdown’s color, tap the circular color palette on your story screen;
- Edit as Desired: Use two fingers to resize and reposition the countdown sticker until it fits perfectly into your story;
- Share with the World: When you’re satisfied with your countdown, tap “Your story” to share it with your Instagram audience.
Unlocking the Instagram Photo Timer Secret
Capturing the perfect moment on Instagram stories has never been easier! While Instagram may not offer a built-in timer feature for stories, there’s a nifty workaround that will have you taking your photos with precision timing. Here’s how:
Step 1: Utilize Your Phone Camera
Open your phone’s camera app. Instagram might not provide a timer, but your phone certainly does!
Step 2: Set the Timer
Within your phone’s camera app, look for the timer feature. This function allows you to delay your photo capture by a few seconds, giving you ample time to prepare.
Step 3: Snap Your Best Shot
Once you’ve set the timer, compose your shot and let your phone work its magic. You’ll have a perfectly timed photo in no time!
Step 4: Share on Stories
After capturing your ideal moment, open Instagram and head to your stories. Here’s where the magic happens.
Step 5: Choose Your Latest Photo
Stories allow you to access your camera roll, so select your freshly timed photo from there.
Step 6: Sharing and Personalizing Your Photo
In this step, you can share your captivating photo with your dedicated followers, and don’t hesitate to utilize Instagram’s extensive array of filters and effects to elevate the visual appeal of your image.
By following these steps, you’ve effectively bypassed the lack of a built-in timer feature on Instagram stories, enabling you to capture photos with precision timing and add your creative touch with filters and effects. Now, your Instagram stories will be perfectly timed and visually stunning!
Can One Initialize a Countdown Before Capturing a Picture in Instagram Stories?
Regrettably, the response is uncomplicated; there is no built-in feature within Instagram allowing the establishment of a countdown or timer prior to snapping a photograph directly within the app.
Instagram has not integrated any functionality that enables users to set a definitive timer before acquiring the image.
Nonetheless, there is a simple alternative method available to overcome this limitation.
The recommended approach is to capture the desired image utilizing the native camera application on your smartphone and subsequently upload the captured photo to your Instagram stories.
And there you have it, a straightforward remedy to the absence of a timer feature in Instagram stories!
Conclusion
In conclusion, setting a timer on Instagram’s camera feature is a simple yet invaluable tool for enhancing your photo and video-taking experience on the platform. Whether you’re a professional content creator or just looking to capture the perfect moment, the timer function empowers you to take more creative and well-composed shots. By following the steps outlined in this article, you can harness the full potential of Instagram’s camera and unlock new possibilities for your visual storytelling. So go ahead, experiment with timers, and elevate your Instagram game to new heights. Happy capturing!
write a meta title. for an article “MAIN KEYWORD”character limit is 60 characters including spaces. use keyword “MAIN KEYWORD” only once.
write a H1 for an article “MAIN KEYWORD”. character limit is 60 characters including spaces. use keyword “MAIN KEYWORD” only once. you can rephrase this keyword.
Your task is to rewrite the entire text in better words and make it unique with natural language. Rewrite the text using a unique and highly varied sentence structure The text to rewrite it is this:
Rewrite and rephrase the text sections below in a unique and creative way and expand each of them. Add more information in each section. Write in a more informative and engaging way. Make each section detailed, comprehensive, and valuable as much as possible for readers. Include useful bullet lists, recommendations, tips, or insights where possible. Do not write from the first-person perspective. Do not copy any words or texts from the text below or from any other texts, articles, or sites. Use only your own words.
write a creative and catchy meta Description for an article “MAIN KEYWORD”. character limit is 150 characters including spaces. use keyword “MAIN KEYWORD” only once.